


There’s something irresistibly charming about a dessert that combines convenience wiht creamy indulgence-enter the delightful no-bake cheesecake jars. These little jars of joy transform the classic cheesecake experience into an easy, mess-free treat that requires no oven time, making them perfect for busy days or last-minute gatherings. With layers of velvety cream cheese filling, buttery crust, adn customizable toppings, no-bake cheesecake jars offer a playful twist on conventional desserts. Whether you’re a seasoned baker or a kitchen novice, these creamy delights promise a no-fuss recipe that’s as pleasing to the eye as it is indeed to the palate.Dive in and discover how simple it is to whip up luscious, individual cheesecakes that bring both comfort and elegance to your dessert table.
Choosing the Perfect Ingredients for Creamy No-Bake Cheesecake Jars
Delightful No-Bake Cheesecake Jars are a luscious treat that come alive with the quality of each ingredient you select. The secret to that irresistibly creamy texture lies in choosing full-fat cream cheese, which offers the perfect balance of richness and tang.Opt for fresh, unsweetened whipping cream or heavy cream rather than lighter substitutes-this greatly enhances the silkiness of the filling.
Don’t underestimate the power of the crust base: classic graham cracker crumbs provide the ideal crunch, but digestive biscuits or even crushed almonds can add a unique twist. For sweetening,using pure,fine powdered sugar rather than granulated ensures your cheesecake filling is smooth without any grit.
Fresh, ripe fruits and high-quality jams or preserves give your jars vibrant color and a burst of natural sweetness. Always select organic blueberries, strawberries, or seasonal fruits to complement your cheesecake layers beautifully. a good-quality vanilla extract will transform the flavor, adding warmth and complexity that elevates this simple dessert to elegant perfection.
Step-by-Step Guide to Layering and Assembling Your Cheesecake Jars
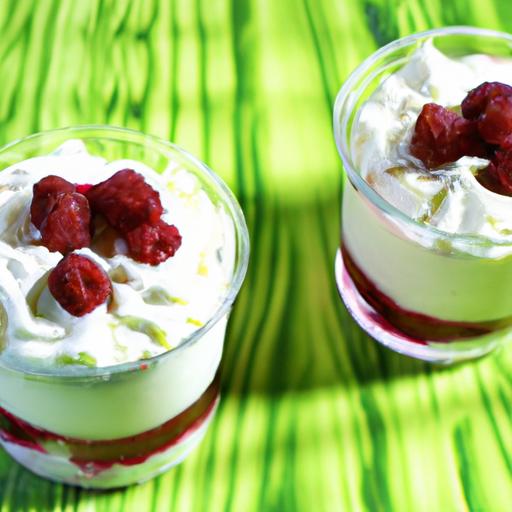
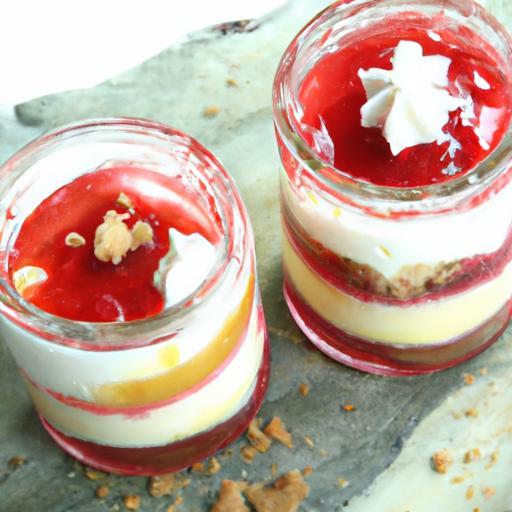
- Prepare your jars: Use clean, clear glass jars (4-6 oz capacity) to showcase the beautiful layers. A short, wide jar works best for easy spooning and visual appeal.
- Start with the crust: Press about 2 tablespoons of your graham cracker crumb mixture firmly into the bottom of each jar to create a sturdy,even layer. This foundational crunch contrasts delightfully with the creamy filling.
- Layer the cheesecake filling: Spoon or pipe a smooth, generous layer of rich cream cheese mixture over the crust. Use a small offset spatula or the back of a spoon to gently level the surface without disturbing the crust.
- Add fruit or jam: Spoon a thin layer of your chosen fruit preserves or fresh fruit here. This adds bursts of flavor and vibrant color,making each bite exciting.
- Repeat layers: For taller jars, alternate more crust, creamy filling, and fruit layers. Aim for at least two layers of filling for maximum decadence.
- Top it off: Finish with a dollop of whipped cream and your favorite creative toppings. This final flourish invites the eye and the palate alike.
Creative Toppings and Flavor Variations to Elevate Your Dessert
- Nutty Crunch: Sprinkle toasted pecans, walnuts, or sliced almonds for texture contrast and nutty richness.
- Chocolate Dream: Drizzle melted dark or white chocolate over the top, or add mini chocolate chips for indulgence.
- Fruit Freshness: Garnish with fresh berries, pomegranate seeds, or thinly sliced kiwi for color and brightness.
- Herbal Accent: Add a sprig of fresh mint or a light dusting of finely chopped basil for a surprising fresh twist.
- Caramel & Spice: Drizzle salted caramel sauce and sprinkle a pinch of cinnamon or nutmeg for cozy warmth.
- Flavor Swaps: Substitute classic vanilla with lemon or orange zest-infused cream cheese for citrusy elegance or fold in lavender or rosewater to transform your jars into floral delights.
Tips for Storing and Serving to Maintain Freshness and Texture
After assembling your Delightful No-Bake Cheesecake Jars, store them in the refrigerator covered tightly with plastic wrap or reusable lids to prevent drying out and to lock in freshness. Thay keep wonderfully for up to 3 days, making them perfect for prepping ahead of gatherings.
When serving, remove the jars from the fridge about 10 minutes beforehand to allow the cheesecake filling to soften slightly for the ideal creamy mouthfeel. Use a small spoon or dessert fork to scoop through the layers, ensuring each bite captures a bit of crust, creamy filling, and fruit topping.
For outdoor events or picnics, pack them in a cooler with ice packs to keep chilled and fresh. Avoid freezing, as this can alter the delicate texture of the cheesecake filling.
Prep and Cook Time
- Prep Time: 20 minutes
- Chill Time: 4 hours minimum (preferably overnight)
- Cook Time: None (no-bake)
Yield
Makes 6 individual 6-ounce jars
Difficulty Level
Easy – perfect for beginners and busy home cooks alike!
Ingredients
- 1 ½ cups graham cracker crumbs (or digestive biscuit crumbs)
- 6 tablespoons unsalted butter, melted
- 16 oz (450 g) full-fat cream cheese, softened
- ¾ cup powdered sugar, sifted
- 1 teaspoon pure vanilla extract
- 1 cup heavy whipping cream, chilled
- ½ cup fruit preserves (strawberry, raspberry, or blueberry)
- Fresh berries or sliced fruit for garnish
Instructions
- Prepare the crust: In a bowl, combine the graham cracker crumbs and melted butter until the mixture resembles wet sand. Divide evenly into your jars and press down firmly with the back of a spoon to form compact layers.
- Make the cheesecake filling: Using a stand mixer or hand whisk, beat the softened cream cheese until smooth and creamy. Gradually add powdered sugar and vanilla extract, continuing to mix until fully incorporated.
- Whip the cream: In a separate chilled bowl, whip the heavy cream to stiff peaks. Gently fold the whipped cream into the cream cheese mixture in batches, using a spatula, to maintain airiness and volume.
- Assemble the jars: Spoon a layer of the blended filling over the crust in each jar. Add a spoonful of fruit preserves or fresh fruit on top. If your jars are tall, repeat layers as desired, finishing with the cheesecake filling.
- Chill: Cover each jar tightly and refrigerate for at least 4 hours, preferably overnight, to allow the cheesecake to set perfectly creamy.
- Serve: Just before serving, add your favorite toppings such as fresh berries, chopped nuts, or a drizzle of chocolate.
Chef’s Notes
- For a tangier flavor, substitute half the cream cheese with mascarpone cheese.
- If you prefer less sweet desserts, reduce powdered sugar to ½ cup.
- Gluten-free? Use gluten-free crackers for the crust.
- Make ahead and store assembled jars in the fridge for up to 3 days-perfect for busy weeknights or parties.
- Avoid over-whipping the cream cheese mixture to keep it light and smooth rather than dense.
- instead of fruit preserves,try swirls of lemon curd or passionfruit pulp for a shining,tropical burst.
Serving Suggestions
Present these dessert jars on a rustic wooden tray with a small dessert spoon tucked beside each jar. Garnish with a sprig of fresh mint or edible flowers to add a pop of color. Consider pairing with a hot cup of coffee or a refreshing iced tea for an elegant end to any meal.
| Nutrient | Per Serving |
|---|---|
| Calories | 320 kcal |
| protein | 5 g |
| Carbohydrates | 25 g |
| Fat | 22 g |

For more dessert inspiration, check out our collection of no-bake desserts. For expert tips on choosing quality cream cheese,visit Serious Eats.
Q&A
Q&A: Delightful No-Bake Cheesecake Jars: Easy,Creamy Treats
Q1: What makes no-bake cheesecake jars a grate dessert option?
A1: No-bake cheesecake jars are perfect for anyone seeking a delicious,creamy dessert without the hassle of an oven. They’re incredibly easy to prepare, require minimal ingredients, and are conveniently portioned – making them ideal for parties, picnics, or simply a dreamy treat at home.
Q2: how do no-bake cheesecake jars stay firm without baking?
A2: The magic lies in the ingredients! Cream cheese provides creaminess and sturdiness, while whipped cream or gelatin helps stabilize the texture. Chilling the jars in the fridge allows the mixture to set properly, resulting in a luscious, firm finish that holds up beautifully in individual servings.
Q3: What are some essential ingredients for a basic no-bake cheesecake jar?
A3: Typically,you’ll need cream cheese,powdered sugar or another sweetener,vanilla extract,and heavy whipping cream or whipped topping. A crumbly base of crushed cookies-like graham crackers or digestive biscuits-adds texture and a subtle crunch to each jar.
Q4: Can I customize the flavors of my no-bake cheesecake jars?
A4: Absolutely! These jars are a versatile canvas for creativity.You can swirl in fruit purees like strawberry, mango, or blueberry, sprinkle chocolate chips or nuts, or add a zest of lemon or orange for a refreshing twist. The possibilities are endless and delicious.
Q5: How should I serve and store no-bake cheesecake jars?
A5: Serve them chilled straight from the fridge for the best creamy texture. They can be stored covered in the refrigerator for up to 3-4 days, making them a convenient make-ahead dessert option. Just give them a swift stir or gentle tap before serving if the top has settled.
Q6: Are no-bake cheesecake jars suitable for kids and beginners in the kitchen?
A6: Yes, they’re perfect for all ages and skill levels! The steps are simple and no oven safety concerns mean kids can safely pitch in. Plus, layering and decorating the jars is a fun way to get creative and personalize each dessert.
Q7: What are some creative toppings to finish off my cheesecake jars?
A7: Fresh berries, toasted coconut flakes, chopped nuts, chocolate shavings, or a drizzle of honey or caramel elevate the look and flavor. Even a sprinkle of edible flowers can turn these creamy treats into charming little masterpieces.
Q8: Can these cheesecake jars be made vegan or dairy-free?
A8: Definitely! By substituting cream cheese and whipping cream with plant-based alternatives like coconut cream, cashew cream, or vegan cream cheese, you can enjoy a luscious, dairy-free version without sacrificing texture or taste.
Q9: How do I avoid the crust getting soggy in no-bake cheesecake jars?
A9: To keep the crust crisp, press the cookie crumbs firmly at the bottom of each jar and consider mixing them with a little melted coconut oil or vegan butter to bind. Layer the creamy filling gently on top to avoid disturbing the crust and refrigerate right away.
With these tips and ideas, your delightful no-bake cheesecake jars will always be a crowd-pleasing, creamy, and easy dessert to enjoy any time!
The Way Forward
Whether you’re craving a quick sweet fix or planning to impress guests without heating up the kitchen, these delightful no-bake cheesecake jars offer the perfect solution. Their creamy texture, layered charm, and customizable toppings make them as versatile as they are delicious. Easy to assemble and utterly indulgent, these treats prove that sometimes, the best desserts require no oven at all-just a little creativity and a love for simple, satisfying flavors. So next time you want a luscious dessert that’s both elegant and effortless, reach for these charming jars and enjoy a scoop of sweetness anytime, anywhere.