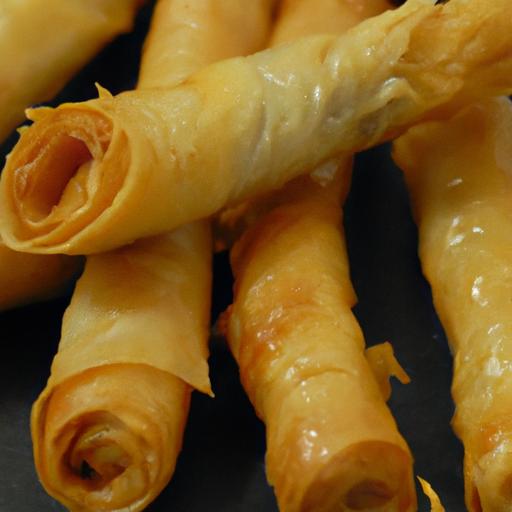


Imagine a golden, crispy roll that crackles delightfully with every bite, revealing a luscious, melty embrace of savory cheese nestled within delicate strands of kataifi dough. This is the magic of crispy Kataifi Tiropita Rolls-a beloved Greek cheese delight that transforms simple ingredients into an irresistible culinary treasure. Rooted in centuries-old traditions yet perfectly suited for modern palates, these rolls capture the essence of Greek cuisine: vibrant flavors, artful textures, and a party of cheese in its most decadent form. Join us as we unravel the story, the techniques, and the irresistible appeal behind this iconic appetizer that promises to enchant your taste buds and elevate any gathering.
The Art of Crafting Kataifi Dough for Ultimate Crispiness
Crispy Kataifi Tiropita Rolls capture the very essence of Greek street food with their irresistible crunch and rich, cheesy filling. The key to achieving that signature golden crisp lies in the kataifi dough, a delicate nest of shredded phyllo strands that bakes to perfection with just the right technique. This magical dough is what transforms simple cheese rolls into an exceptional culinary experience.
The kataifi dough arrives as thin, stringy strands resembling finely shredded hair, allowing hot butter to coat and crisp each thread individually. To craft the ideal base, gently loosen and separate the strands to avoid clumping – you want an airy, light texture that crisps rather of sogging. The secret? Patience and a delicate touch when handling kataifi.
Before rolling, brush every layer liberally with melted, unsalted butter. The butter not only adds luscious flavor but also ensures even browning and that unforgettable snap when you bite in. For extra crunch, some purists like to toss the kataifi in a pinch of fine semolina, which lends contrast and a slight nuttiness.
Selecting the Perfect Cheese Blend for Authentic Tiropita Flavor
Add depth to your Crispy kataifi Tiropita Rolls by choosing a blend of cheeses that honors tradition but amplifies flavor. The heart of any tiropita is its cheese filling,and authenticity hinges on combining feta with a milder,melting cheese like kasseri or mizithra. This blend melds tangy saltiness with creamy richness, yielding a filling that’s moist but not watery.
Ensure your feta is high-quality and unpasteurized if possible, for a bold but clean flavor punch.Kasseri, a semi-hard cheese with buttery tones, adds luscious melt and a supple texture that balances feta’s crumbly bite. Mizithra or ricotta (fresh and unsalted) can be stirred in to soften the mix and bring a subtle milky sweetness.
For seasoning, fresh herbs like dill or mint brighten the filling beautifully, while a touch of cracked black pepper and freshly grated nutmeg layers in complexity without overpowering the cheeses.
Step-by-Step Guide to Rolling and Baking Crispy Kataifi Tiropita
- Prepare the kataifi dough: Unwrap and gently loosen the strands using your fingers,separating any clumps. Keep the dough covered with a damp cloth to prevent drying out as you work.
- Brush generously with melted butter: Using a pastry brush, coat the kataifi evenly with clarified butter. this step is crucial for crispiness.
- Form the cheese filling: In a bowl,combine crumbled feta,grated kasseri,and mizithra with chopped fresh herbs,a pinch of black pepper,and a light sprinkle of nutmeg. Mix gently to avoid breaking the cheese.
- Shape the rolls: Take a small handful (about 2 tablespoons) of kataifi and flatten lightly. place a spoonful of the cheese mixture near one edge. Roll tightly into finger-length cylinders, tucking the ends to prevent filling leaks.
- Arrange on baking tray: Place rolls seam-side down on a parchment-lined baking sheet, spacing evenly to allow heat circulation.
- Final butter brush: Give each roll a last coat of melted butter to encourage that tantalizing golden finish.
- Bake: Preheat your oven to 375°F (190°C). Bake for 25-30 minutes until deep golden and crisp, turning halfway if needed for even browning.
- Rest: Let rest for 5 minutes to firm up the crust before serving.
Serving Suggestions and Pairings to Elevate Your Greek Cheese Rolls
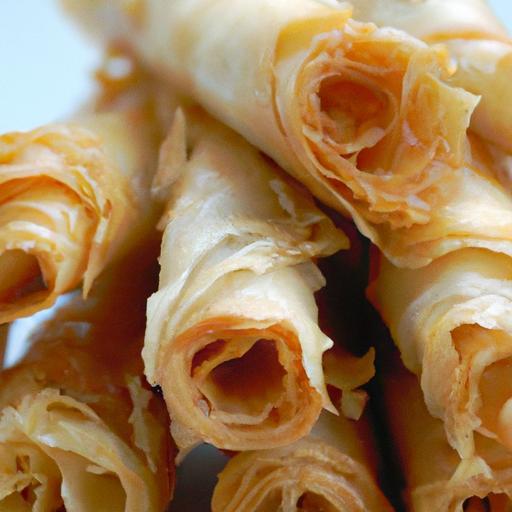
Present your Crispy Kataifi Tiropita Rolls warm and inviting on a rustic wooden platter or classic white serving dish. A scattering of finely chopped fresh parsley or mint adds visual freshness and herbal brightness. For dipping, accompany with a cool tzatziki sauce or a honey-thyme drizzle to highlight the salty-sweet contrast.
These rolls pair beautifully with a chilled Greek salad of ripe tomatoes, cucumbers, Kalamata olives, and red onion, dressed simply with extra virgin olive oil and oregano. For drinks, a sparkling water infused with lemon or a non-alcoholic pomegranate spritzer complements the savory richness perfectly without overshadowing.
The crisp, golden kataifi exterior combined with a melty, aromatic cheese filling makes this appetizer ideal for celebrations, mezze spreads, or an indulgent snack to savor slowly with friends and family.
Prep and Cook Time
- Readiness: 30 minutes
- Cooking: 30 minutes
- Total time: 1 hour
Yield
Makes approximately 20 rolls (serves 6-8 as an appetizer)
Difficulty Level
Medium – requires gentle handling of dough and some rolling practice
Ingredients
- 500g kataifi dough (shredded phyllo pastry, thawed if frozen)
- 150g feta cheese, crumbled
- 150g kasseri cheese, grated
- 100g mizithra or ricotta, fresh
- 3 tbsp fresh dill, finely chopped
- 2 tbsp fresh mint, finely chopped (optional)
- Freshly ground black pepper, to taste
- Pinch of nutmeg
- 150g unsalted butter, melted and warm
Instructions
- preheat oven to 375°F (190°C) and line a baking tray with parchment paper.
- Unroll the kataifi dough and gently separate the strands with your fingers to prevent clumping.
- Brush the kataifi generously with melted butter, ensuring even coverage throughout.
- In a bowl, combine the feta, kasseri, mizithra, dill, mint, nutmeg, and black pepper. Mix gently but thoroughly.
- Take a small portion of kataifi dough and flatten it slightly in your palm.
- Place a tablespoon of cheese filling at one end, than roll it tightly into a cigar shape. Tuck in the edges.
- Place each roll seam-side down on the baking tray, spacing them about an inch apart.
- Brush the tops with additional melted butter for enhanced browning.
- Bake for 25-30 minutes, or until golden brown and crisp. Rotate tray halfway if necessary for even cooking.
- Let rolls cool for 5 minutes before serving to allow the crust to set.
Tips for Success
- Keep kataifi covered with a damp cloth to prevent drying while you assemble the rolls.
- Use unsalted butter for better control over saltiness in the final dish.
- For a vegetarian-amiable version, keep the cheese blend as is but avoid adding any animal rennet cheeses.
- Make ahead: Assemble the rolls, keep them covered in the fridge, and bake within 12 hours for optimal freshness.
- To deepen flavor, add a teaspoon of lemon zest to the cheese mixture for subtle brightness.
Serving Suggestions
- Serve warm with a side of chilled tzatziki sauce for dipping.
- Garnish with freshly chopped parsley or mint leaves for a vibrant finish.
- Pair with a fresh Greek salad or marinated olives for a complete mezze experience.
- Drizzle lightly with local honey and sprinkle toasted sesame seeds for an exciting sweet-savory twist.
- Accompany with lemon wedges for guests to squeeze over rolls as desired.
| Nutrition (per roll) | Calories | Protein | Carbs | Fat |
|---|---|---|---|---|
| Energy | 180 kcal | 6 g | 12 g | 12 g |

For more authentic Greek appetizers, explore our spanakopita recipe that pairs beautifully alongside these cheese rolls. Additionally, dive into the history and variations of kataifi dough at Olive Tomato to deepen your culinary knowledge.
Q&A
Q&A: Crispy Kataifi Tiropita Rolls – A Greek Cheese Delight
Q1: What exactly are Kataifi Tiropita Rolls?
A1: Kataifi Tiropita rolls are a appetizing Greek appetizer made by wrapping creamy, savory cheese filling in delicate strands of kataifi pastry-shredded phyllo dough that crisps up beautifully when baked.The result is a golden, crunchy roll bursting with cheesy goodness.
Q2: How does kataifi pastry differ from regular phyllo dough?
A2: Kataifi pastry looks like thin, shredded threads, almost like fine angel hair pasta, whereas regular phyllo dough is rolled into thin sheets. This difference allows kataifi to deliver an extraordinary crispiness and a unique texture that contrasts wonderfully with the soft cheese filling.
Q3: What kinds of cheese are traditionally used in Kataifi Tiropita Rolls?
A3: The cheese blend often includes tangy feta combined with creamy ricotta or sometimes a mild kasseri or mizithra. This mix creates a harmonious balance of salty, creamy, and slightly tangy flavors central to authentic Greek tiropita.
Q4: Are Kataifi Tiropita Rolls suitable for vegetarians?
A4: Absolutely! these rolls are typically made with cheese and pastry without any meat,making them a popular vegetarian appetizer option that still feels indulgent and satisfying.Q5: Can Kataifi Tiropita rolls be prepared ahead of time?
A5: Yes! You can assemble the rolls in advance and refrigerate or even freeze them before baking. Baking from chilled or frozen states only requires a few extra minutes in the oven, allowing for fresh, crispy rolls whenever you need.
Q6: What’s the secret to making these rolls perfectly crispy?
A6: The key lies in brushing the kataifi strands generously with butter or olive oil to promote golden crispiness during baking. Also, baking at a high temperature ensures the exterior becomes crunchy, while the cheese inside melts into a luscious filling.
Q7: Are there any creative twists to the conventional cheese filling?
A7: Some variations incorporate fresh herbs like dill, parsley, or mint to brighten the flavor. Others might add a hint of lemon zest or ground black pepper for extra depth, allowing you to personalize the classic recipe without losing its Greek charm.Q8: What occasions are ideal for serving Kataifi Tiropita Rolls?
A8: These rolls shine as appetizers at festive gatherings, casual dinner parties, or even as a special snack during holiday celebrations. Their elegant look and irresistible crunch make them crowd-pleasers every time.
Q9: Can these rolls be enjoyed warm and cold?
A9: While best served warm, when the cheese filling is melty and the kataifi crisply golden, they still taste delightful at room temperature, making them versatile for buffet-style meals or picnics.
Q10: where can I find kataifi pastry if I want to try making these at home?
A10: Kataifi pastry is frequently enough sold frozen in Mediterranean or specialty grocery stores. Look for it alongside phyllo dough or in the frozen pastry aisle. Once thawed, handle it gently to preserve its delicate strands for that signature crispy texture.
Concluding Remarks
Whether enjoyed as a comforting snack, a party appetizer, or a centerpiece at your next gathering, Crispy Kataifi Tiropita Rolls capture the essence of Greek culinary artistry in every flaky, cheesy bite. Their golden strands of kataifi wrapping a luscious cheese filling create a harmony of textures and flavors that invite you to savor tradition with a modern twist. So next time you crave something both indulgent and authentically Greek, let these irresistible rolls transport your taste buds to sun-soaked Mediterranean shores-one crispy, melty morsel at a time.