


In today’s fast-paced world, keeping your energy levels high can feel like a constant challenge.Whether you’re powering through a busy workday, hitting the gym, or chasing after little ones, having a nutritious snack on hand is a game changer. Enter the humble protein bar: a flavorful, convenient way to fuel your body and keep fatigue at bay. But why settle for store-bought bars packed with unknown additives when you can whip up your own in minutes? In this article,we’ll guide you through an easy homemade protein bars recipe that not only boosts your energy but also lets you customize every bite to suit your taste and nutritional needs. Say goodbye to afternoon slumps and hello to your new favorite energy booster!
Choosing the Right Ingredients for Maximum Energy and Nutrition
Boost Your Energy with homemade protein bars starts with selecting nutrient-dense, wholesome ingredients that fuel your body and satisfy your cravings. Begin by opting for high-quality protein sources such as natural nut butters, plant-based protein powders, or collagen peptides to ensure muscle repair and sustainable stamina. Incorporate complex carbohydrates like rolled oats or quinoa flakes that provide slow-releasing energy throughout your day.Adding natural sweeteners such as honey or maple syrup balances the flavors without the crash of refined sugars. For texture and essential fats,reach for seeds like chia or flaxseed,and crunchy nuts that contribute both richness and a satisfying bite.Lastly, a pinch of natural spices-think cinnamon or vanilla extract-can elevate the flavour profile, making each bar a treat that’s as delicious as it is nourishing.
Step by Step Guide to Crafting your Perfect Protein Bar
- Gather your dry ingredients – Combine rolled oats, protein powder, chia seeds, and a touch of salt in a large mixing bowl to create your energy-packed base.
- Mix your wet ingredients – In a separate bowl, stir together almond butter, honey, and vanilla extract until smooth and creamy.
- Incorporate the dry mix into the wet – Gradually add the dry ingredients to the wet mixture, folding gently with a spatula until thoroughly combined but not overmixed, preserving that chewy texture.
- press into a lined pan – Transfer the mixture evenly into a parchment-lined 8×8-inch pan. Press down firmly with your hands or a spatula to compact the bars, ensuring they stick together after baking or refrigeration.
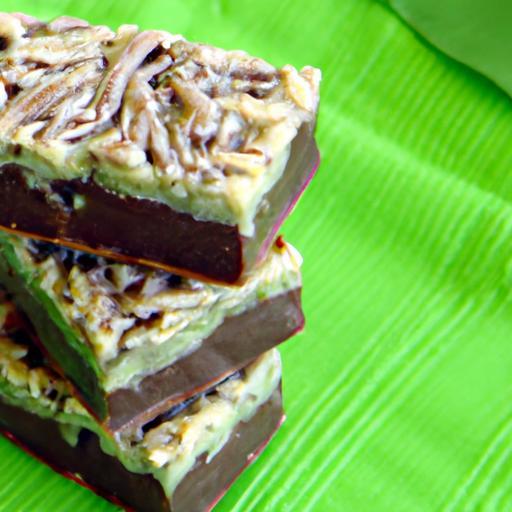
- Chill or bake - For no-bake bars, refrigerate for at least 2 hours until firm. For baked bars, preheat your oven to 350°F (175°C) and bake for 15 minutes or until golden on top. Let cool wholly before slicing.
Tips to Customize Flavors and Textures for Every Taste
Experiment with your homemade bars by swapping ingredients to suit your palate and dietary goals. Blend in dried fruits like cranberries or chopped apricots for natural sweetness and a chewy surprise. Add dark chocolate chips for bursts of indulgence that also offer antioxidants. Replace almond butter with sunflower or peanut butter for nut allergy-pleasant alternatives. To vary texture, include puffed quinoa for extra crunch or shredded coconut for subtle tropical flair. Always taste the mixture before setting or baking-adjust sweetness or spice levels incrementally so each batch becomes your personal signature.
Storing and Enjoying Your Homemade protein Bars for Long-Lasting Freshness
Proper storage is essential to keep your Boost Your Energy protein bars fresh and delicious throughout the week. Store them in an airtight container and refrigerate to maintain firmness and prolong shelf life, especially if your recipe includes perishable nut butters or fresh fruit.For grab-and-go convenience, wrap bars individually in parchment paper or reusable wax wraps before placing in a container. You can also freeze bars for up to 3 months; just thaw at room temperature for 10 minutes before enjoying. To enhance presentation, drizzle with melted dark chocolate or sprinkle coarse sea salt just before serving - a simple touch that elevates both flavor and appeal.
Prep and Cook Time
- Preparation: 10 minutes
- Cooking/Baking: 15 minutes (optional)
- Chill Time: 2 hours
Yield
8 bars (approximate, depending on slice size)
Difficulty Level
Easy – No fancy equipment or techniques needed
Ingredients
- 1 ½ cups rolled oats, old-fashioned
- 1 cup natural almond butter (or peanut/sunflower butter)
- ½ cup protein powder, unflavored or vanilla (whey, plant-based, or collagen)
- ¼ cup honey or pure maple syrup
- 2 tbsp chia seeds
- 1 tsp vanilla extract
- pinch of fine sea salt
- Optional: ¼ cup dark chocolate chips, dried cranberries, or chopped nuts
Instructions
- prepare your workspace: Line an 8×8-inch baking pan with parchment paper, leaving an overhang for easy removal.
- Combine dry ingredients: In a large bowl, mix the rolled oats, protein powder, chia seeds, and salt until well distributed.
- Mix wet ingredients: Warm almond butter slightly to soften if needed, then stir in honey and vanilla extract until smooth and uniform.
- Fold dry into wet: Gradually add the dry mix to the almond butter mixture. Stir gently with a spatula until all ingredients stick together cohesively.
- Add any optional extras: Carefully fold in chocolate chips, dried fruit, or nuts, maintaining an even spread.
- press mixture into pan: Transfer into the lined pan. Press firmly and evenly with your fingers or the back of a spoon to compact the mixture well.
- Set your bars: For no-bake, refrigerate for at least 2 hours before slicing. For baked bars, place in a preheated oven at 350°F (175°C) for 15 minutes until just golden, then cool completely.
- Slice and serve: Remove bars using the parchment overhang. Cut into 8 equal pieces and enjoy immediately or store as preferred.
Chef’s Notes
- Substitutions: Swap almond butter for sunflower seed butter to create a nut-free variant.
- Make-ahead: These bars store well in the fridge for up to a week or freezer for three months.
- Texture Tips: soften sticky mixtures with a teaspoon of warm water or additional nut butter if the batter feels too dry.
- Sweetness: Adjust honey or maple syrup quantity according to your preference or choose a sugar-free syrup option.
Serving Suggestions
Enjoy your Boost Your Energy protein bars as a fast breakfast on the go, a midday snack, or post-workout refuel. Pair with a cup of herbal tea or cold-pressed juice for a balanced mini-meal. For presentation,stack bars on a rustic wooden board lined with banana leaves and sprinkle lightly with toasted coconut flakes or a dusting of cinnamon.Wrap individual bars in parchment and tie with twine for a stunning homemade gift idea perfect for friends who appreciate wholesome energy boosts.

| Nutrient | Per Bar (Approx.) |
|---|---|
| Calories | 210 kcal |
| Protein | 12 g |
| Carbohydrates | 18 g |
| Fat | 10 g |
Discover more tips on homemade healthy snacks in our Healthy Snack Ideas collection. For detailed guidance on choosing quality protein powders, visit Healthline’s guide.
Q&A
Q&A: Boost Your Energy with Easy Homemade Protein Bars
Q1: Why should I make my own protein bars instead of buying them?
Making your own protein bars lets you control exactly what goes inside-no hidden sugars, chemicals, or preservatives. Homemade bars are fresher,customizable to your taste and dietary needs,and can be more cost-effective than store-bought options.
Q2: what are the key ingredients for a nutritious homemade protein bar?
A balanced protein bar typically combines a protein source (like nut butter, protein powder, or nuts), healthy carbs (oats, dried fruits), and wholesome fats (seeds, nut butters). Adding natural sweeteners like honey or maple syrup and a pinch of salt rounds out the flavor perfectly.
Q3: Can I make these bars if I’m vegan or gluten-free?
Absolutely! Use plant-based protein powders such as pea or rice protein and swap out regular oats for certified gluten-free oats. Nut and seed butters, along with dried fruits, are naturally vegan and gluten-free, making these bars versatile for many diets.
Q4: How do I keep my homemade protein bars from drying out?
Store your bars in an airtight container,preferably in the fridge,to maintain moisture and freshness. Using ingredients like nut butters and honey also helps keep the bars chewy and moist.
Q5: How much protein does one homemade bar typically contain?
Protein content varies depending on your recipe, but most homemade bars offer between 10 to 15 grams of protein per serving. Adjust protein powder or nut butter amounts to meet your energy needs.
Q6: Can I customize the flavor of my protein bars?
Definitely! Stir in cocoa powder for a chocolate twist, add shredded coconut for tropical vibes, or sprinkle in cinnamon and vanilla for warm, comforting notes. The possibilities are endless-get creative and find your favorite flavor combo.
Q7: Are these bars suitable as a pre- or post-workout snack?
Yes! Their balanced mix of protein, carbs, and fats provides sustained energy for workouts and aids muscle recovery afterwards. Having a homemade bar on hand is a convenient way to fuel your fitness routine.
Q8: How long do homemade protein bars keep, and can I freeze them?
Stored in the fridge, these bars usually stay fresh for about a week. For longer storage, yes, wrapping them individually and freezing will keep them good for up to three months. Just thaw before enjoying!
Q9: What kitchen tools do I need to prepare these bars?
A mixing bowl, spatula, baking dish or pan for shaping, and optionally a food processor if you want a smoother texture. No fancy gadgets required-easy and quick!
Q10: Can kids eat these homemade protein bars?
Absolutely! made from wholesome, natural ingredients, these bars are a great energy boost for active kids. Just tailor sweetness and texture to their preferences for a kid-friendly treat.
final Thoughts
Energizing your day doesn’t have to be complex or costly. With this easy homemade protein bars recipe, you hold the key to a delicious, nutritious boost that fits right into your lifestyle. Whether you’re powering through a busy workday, gearing up for a workout, or just need a wholesome snack, these bars deliver the fuel your body craves-without any needless additives. So next time hunger strikes, skip the processed options and treat yourself to a homemade pick-me-up that’s as satisfying as it is simple. Here’s to more energy, more flavor, and a healthier you-one bite at a time!